 Damon胡东东
Original article link: https://blog.hudd.cn/1423.html
PWA stands for Progressive Web App. It leverages technologies like Service Workers and caching to allow web pages to run on mobile phones much like native apps. It supports adding to the home screen (installation), push notifications, and offline access through caching.
A PWA primarily relies on these key technologies:
- HTTPS: To ensure security, sitewide HTTPS is an absolute prerequisite.
- Service Worker: Enables the web page to run offline and cache resources.
- Web App Manifest: Uses a
manifest.jsonfile to define the app icon, launch mode, theme colors, etc.
At its core, a PWA is still a website, so its performance cannot fully match a native app, and its access to hardware APIs is restricted. However, transforming a site into a PWA allows users to install it onto their home screens and open it with a single tap. This is much faster than searching or typing a URL, and its caching mechanism is far more efficient than standard browser caching.
Introduction to TWA
While a PWA allows users to open a browser and "Add to Home Screen" (essentially a highly integrated shortcut to a specific website), a TWA (Trusted Web Activity) takes this a step further. It wraps and deploys the PWA as a native Android application.
Using TWA, you can directly bundle your PWA into an APK or AAB file, submit it to the Google Play Store for review, and allow users to download and install it. TWA is restricted to the Android ecosystem and acts essentially as an Android shell around your website.
Bubblewrap is the official CLI tool recommended by Google for TWA packaging. Once your PWA is configured, Bubblewrap handles the compilation. Let's get started with the hands-on guide.
Step 1: Converting Your Website into a PWA
1. Logo Icons
Prepare two PNG logo icons with resolutions of 192x192 and 512x512. Name them icon-192.png and icon-512.png, and place them in your website's root directory.
2. Configure manifest.json
Create a new file named manifest.json in your website's root directory. You can use the following template as a baseline and modify the values to fit your site:
{
  "name": "Damon胡东东",
  "short_name": "hudd",
  "start_url": "/",
  "display": "standalone",
  "background_color": "#ffffff",
  "theme_color": "#000000",
  "icons": [
    {
      "src": "icon-192.png",
      "sizes": "192x192",
      "type": "image/png"
    },
    {
      "src": "icon-512.png",
      "sizes": "512x512",
      "type": "image/png"
    }
  ]
}
3. Create the Service Worker File
Create a new file named sw.js in your website's root directory with the following minimal content:
self.addEventListener('fetch', () => {});
Note: This bare-minimum implementation does nothing, but it satisfies the browser's automated PWA detection requirement. If you want to implement custom caching strategies, you can search for more advanced Service Worker configurations (e.g., usinginstallandfetchhooks to update caches dynamically).
4. Reference the Files in index.html
Inside your homepage's <head> tag, reference the JSON and JavaScript files. Avoid placing them in the <body> tag, as some browsers may fail to recognize them properly.
<link rel="manifest" href="/manifest.json">
<script>
if ('serviceWorker' in navigator) {
  navigator.serviceWorker.register('/sw.js');
}
</script>
5. Verification
Once configured, an install button should appear in the Google Chrome address bar when visiting your site.
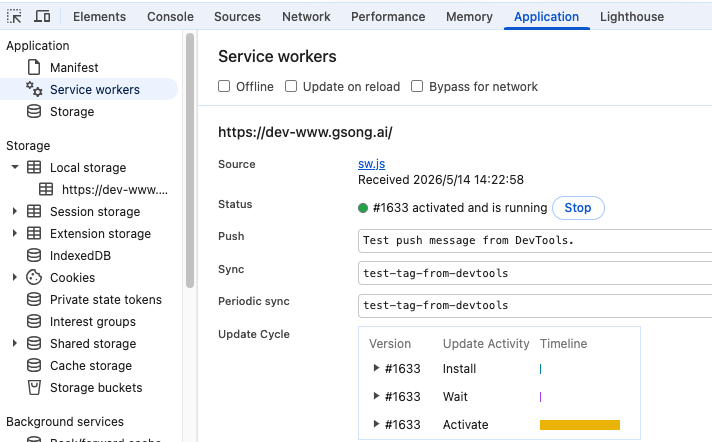
Open Chrome DevTools and navigate to the Application panel. Under the sidebar, you can verify your Manifest and Service workers configurations. The status of sw.js should read activated and is running. Your PWA configuration is now complete.
Step 2: Installing Bubblewrap
Now that the website supports PWA features, we will install Bubblewrap to handle the TWA build process.
1. Install Node.js
Mac users can refer to Node environment setup tutorials or use Homebrew along with nvm to manage Node versions.
2. Install Bubblewrap CLI
Run the following command in your terminal:
npm i -g @bubblewrap/cli
3. Initialize the Bubblewrap Project
Create a new empty folder, navigate into it, and run the bubblewrap init command. Make sure to replace the URL with your actual domain:
bubblewrap init --manifest=https://hudd.cn/manifest.json
Pro-Tip: To keep it simple, you can hit Enter all the way through to accept the default configuration. If Bubblewrap detects missing dependencies, it will ask if you want it to download them automatically. Type Y and let it handle everything.Troubleshooting: What if the network speed is too slow and downloads fail?
The command line often struggles with proxies, and downloading the JDK or Android SDK (both over 100MB) can easily time out. You can circumvent this by manually setting up the configuration file.
This configuration is stored inside config.json in the .bubblewrap directory under your user profile folder. You can manually download and extract the JDK and Android SDK directly into this folder.
Taking macOS as an example:
- Download the JDK 17 binary archive: Go to Adoptium Temurin Releases and download the
.tar.gzpackage (e.g.,jdk-17.0.11+9.tar.gz). Extract it into a folder namedjdkinside your~/.bubblewrap/directory. - Download the Android SDK Command-line Tools: Scroll down to the "Command line tools only" section on the Android Studio Developer Page. Extract the archive. Crucial: The extracted folder must be renamed to
toolsand placed inside anandroid-sdkfolder under~/.bubblewrap/.
Your hidden directory structure should look exactly like this:
.bubblewrap/
├── android-sdk/
│   └── tools/
│       ├── bin/
│       ├── lib/
│       └── ...
├── jdk/
│   └── jdk-17.0.11+9/
│       └── Contents/
│           ├── Home/
│           │     ├── bin/
│           │     ├── lib/
│           │     └── ...
│           ├── MacOS/
│           └── ...
└── config.json
Once arranged, re-run the bubblewrap init command. When prompted to configure the paths, type n and hit Enter. The CLI will ask you to specify the exact locations of your JDK and Android SDK. Provide the absolute paths to the extracted directories.
Based on the structure above, your config.json will ultimately look like this:
{"jdkPath":"/Users/damon/.bubblewrap/jdk/jdk-17.0.11+9","androidSdkPath":"/Users/damon/.bubblewrap/android-sdk"}
Step 3: Configuring TWA Settings in Bubblewrap
Once the environment is properly mapped, running bubblewrap init will lead you to the base configuration steps. The CLI automatically pulls values from your manifest.json, but you can modify them on the fly (such as the app name).
Set up your domain, directory, Application Name, and Application ID according to your project requirements. If they already match your manifest, you can hit Enter through most steps.
Warning: For "Include support for Play Billing", select No (n) if your website does not explicitly use Google Play Billing. Payment gateways face highly stringent review policies and have specific SDK version dependencies.KeyStore Password:
After filling in the basic metadata, the final step will ask you for details to generate a keystore file (android.keystore by default). Keep this file safe! You will need it every time you update your app in the future. Back it up to Git or secure cloud storage.
Once finished, your empty folder will be populated with a ready-to-go Android TWA project.
Step 4: Compiling and Building the Project
The output of the initialization is a standard Android project structure. You can open it and tweak the source code in Android Studio, or you can build it via the CLI by running:
bubblewrap build
Enter your keystore password, accept the license agreements, and wait for the Building the Android App... process to finish.
The build command automatically tracks and installs required build dependencies—such as platform-tools, platforms, and build-tools—directly into the android-sdk directory you specified during initialization. If the process throws an error and you prefer to install these packages manually, run the following commands:
JAVA_HOME=~/.bubblewrap/jdk/jdk-17.0.11+9/Contents/Home
PATH=$JAVA_HOME/bin:$PATH
~/.bubblewrap/android-sdk/tools/bin/sdkmanager "platform-tools" "build-tools;35.0.0" "platforms;android-35"
Once compilation completes, the CLI will output .apk and .aab files. The .aab (Android App Bundle) file is what you will upload to the Google Play Console for review.
Step 5: Configuring assetlinks.json on Your Website
The assetlinks.json file is vital for Digital Asset Links validation. It proves that you own both the website and the application. If this file is missing or contains incorrect hashes, your app will display a clunky browser URL address bar at the top when launched.
Create an assetlinks.json file and upload it to a directory named .well-known at your website's root (e.g., https://hudd.cn/.well-known/assetlinks.json).
The baseline structure of the file is as follows:
[{
  "relation": ["delegate_permission/common.handle_all_urls"],
  "target": {
    "namespace": "android_app",
    "package_name": "YOUR_PACKAGE_ID",
    "sha256_cert_fingerprints": ["YOUR_SHA256_FINGERPRINT"]
  }}]
- Package ID: The Application ID of your Android app.
- SHA-256 Fingerprint: The cryptographic certificate fingerprint of your signing key (this is an array, allowing you to add multiple fingerprints for debug and release keys).
You can extract the SHA-256 fingerprint from your android.keystore file using the following command:
keytool -list -v -keystore /PATH_TO_YOUR_KEYSTORE/android.keystore
After entering the password, look for the value immediately following SHA256:.
Alternatively, you can extract it directly from a signed APK file (the resulting hash matches the keystore file exactly):
keytool -printcert -jarfile /PATH_TO_YOUR_APK/app-release-signed.apk
Your final production assetlinks.json file should look like this:
[{
  "relation": ["delegate_permission/common.handle_all_urls"],
  "target": {
    "namespace": "android_app",
    "package_name": "cn.hudd.www",
    "sha256_cert_fingerprints": ["3E:FD:7B:B0:B2:5F:46:54:3E:94:50:38:CC:..."]
  }
}]
And that's it! Your PWA is now fully compiled into a TWA app and ready for deployment.
Copyright:Damon胡东东 - hudd.me
This article is licensed under a Creative Commons Attribution 4.0 International License.Reprinting or using large sections must include a link to this article, otherwise you will constitute infringement!
Comments(0)